
What is Builder Gel?
Hi!
If you’re new here, welcome!! I’m Kara, I’m a licensed nail tech and certified educator. I’m so excited to share more info in this post with what I've learned recently about using builder gel safely and keeping your natural nails healthy.
Builder gel is my entire personality right now and the reason is because it’s changed my nails and my life and I just want everyone to know more about it! This post is going to be Builder Gel 101 and it will include everything you need to know to get started with this magic product!

ALSO - Use code KARA10 for 10% off any Kokoist & Nail Thoughts product and Subscribe to my newsletter for 10% off any course on my website :)
What Is Builder Gel?
Builder gel is a type of gel polish product that can either be hard gel (aka you cannot soak it off with acetone) or semi-hard (aka you CAN soak it off with acetone, and it’s slightly more flexible), that has a thicker viscosity than regular bases/color gels, so you’re able to build up / structure your application to give your nails strength to grow out without breaking. This is also known as building an apex, doing a structured overlay, adding structure, etc.
Learn how to use & apply builder gel like a professional with my video class
My Advanced Gel Manicure: E-File Removal, Cuticle Prep & Builder Gel Application Course is a THOROUGH, DETAILED, IN-DEPTH, 2-hour and 11-minute video course where I break down my exact process for e-filing your gel manicure to prep for your next manicure (AKA gel polish removal), prepping your nails for another gel manicure, and applying builder gel.
Use code KARA10 for 10% off your purchase of any class!

If you're only interested in learning the basics of builder gel (without the e-file portion), you should check out my Expert Builder Gel Class! There is way more info on this page!
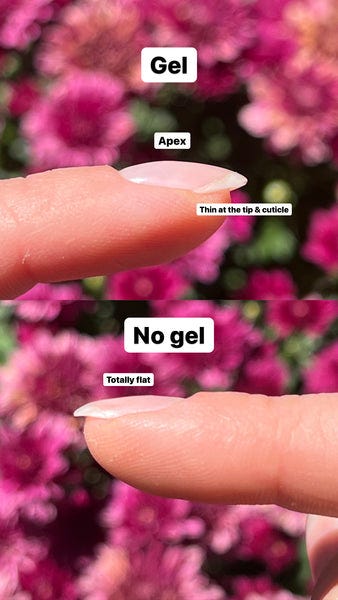
What is an apex?
An apex is the curved stress area of your nail. Aesthetically, I think it gives you that true “plump” gel manicure look, but it’s also used to give your nails extra strength if they’re long so that they don’t break! In my builder gel course, I’ll show you how to use these gels to build an apex on your nail. Photos below:
Let’s Talk About the Kokoist Brand:
Before we get too deep into this… let’s talk about the specific builder gel that I use and why. I mainly use Kokoist’s gels and they have a few different ones in their collection that I’ve come to love! I'm a certified educator with Kokoist & Nail Thoughts and I've been using their products for years at this point. I feel like I really understand the composition of their products and how they work so I really love using and teaching others how to use them too.
Ps. Use my code KARA10 for 10% off any product from Kokoist and Nail Thoughts!
Kokoist is pure Japanese gel (more on that in the blog post linked at the end), and only has soft and semi-hard gels, so everything CAN be soaked off with acetone, although they’re really made to do fills (or rebalances), which means that you just file off the grown out manicure leaving on a thin layer of base gel, prep your nails, and then reapply.
The fill process leaves a thin layer of base gel on your natural nail, which prevents you from overprepping your natural nails (i.e. damaging them), and it keeps your nails feeling stronger so they can keep growing out.
Learn more about this process here and watch my course showing the process here
There are so many ways this topic could go, so I’m going to try to stay on track!
The way that I teach/talk about this product, there are 5 levels of nail products and each one has a different level of hardness and adhesion. Read this blog post for more info on the levels because they’re very important to understand and figure out which one is right for you and the strength of your nails!
My Favorite Builder Gels:
So my favorite builder gels that I use all the time are the Nail Thoughts x Kokoist tinted builder base gels (read more about them HERE) and Platinum Filler Base. I like them for different reasons, so let’s get into both!
Nail Thoughts x Kokoist Tinted Builder Bases:
These are semi-hard medium adhesive polishes that are a 3-in-1. They’re a base gel, a builder gel, and a color all in one!
Read this review all about NT Bases here!
These are really great for more clients and people who want to use builder gel because they have a good amount of flexibility and adhesion, almost like a perfect marriage!
Side note: it’s SO important to understand the strength of your natural nails when choosing a product. Please read this blog post to understand more. If you choose a builder that’s too hard for you, it will lift or crack!

So this builder gel is flexible enough to bend and flex with your natural nail as you live your daily life, which is really important because if the gel is too rigid, it will just pop off. And it’s adhesive enough to grip onto your nails so it won’t lift from bending and flexing.
I’m going to get into lifting more at the end, don’t worry ;)
I also love this gel because there are I think 40+ colors to choose from, and you can apply it directly on your nails, do your apex and either add a top coat and be done, add some art or chrome and (top coat) be done, or add more color! There are alot of possibilities but it just speeds up the manicure and gives you a really nice tinted base to do your nails on!
My top 5 favorite colors:
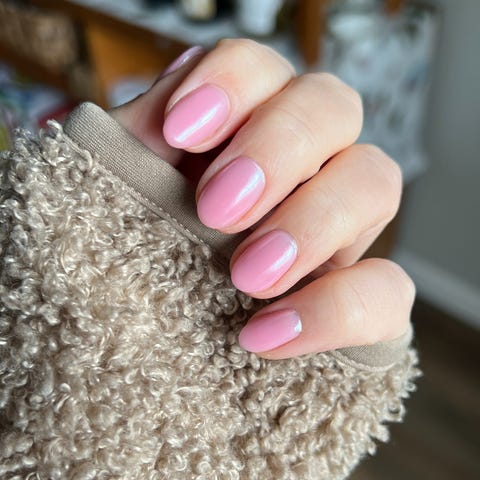
Cotton Candy Base (pictured above)
Platinum Filler Base:

This is also a 2-in-1 product, it’s a base gel and a builder gel but it’s clear! This one is HEMA free and it’s formulated with nanocolloids that give it an antibacterial effect. Which this just clicked in my brain recently lol, but it’s great because if you’re doing fills with this product, you’re essentially never fully soaking it off/removing it, so having a base that blocks bacteria from growing on your nail is really great because it keeps your natural nails safe, healthy and *saying this one last time* free from bacteria! Who wouldn’t love that!

In terms of flexibility and adhesion, this one is like one step up from the NT bases because it’s less flexible (aka harder) and because of that, it’s slightly less adhesive. But to be honest, I don’t really notice a difference in adhesion, I apply this directly on my nails and don’t have any lifting issues (more on lifting later, don’t worry!).
The reason I love this one is because of the hardness, like it turns my nails into unbreakable strong beautiful things. The strength is just unmatched. I definitely notice a difference from the NT bases, and I really like using this when my nails are a little bit longer. I still can use the NT bases and love them when my nails are longer too, but I’ve just been reaching for this one alot.
How Do You Apply Builder Gel?
Ok let’s hit on some important need to knows about using and applying builder gel:
-
This is not normal polish or gel, because of it’s thicker viscosity, you really need to apply it in a structured manner or else it will crack or lift or pop right off
-
Watch my builder gel application course to learn how to properly apply it
-
-
Since you built up an apex or structure, it’s safe to use an efile on your nails, because the apex is preventing it from touching your natural nail. The whole process works together so nicely!!!
-
Watch my Advanced Gel Manicure Class to learn how I do this exact process
-
-
I like to do fills because it keeps my nails feeling strong, and I can avoid an acetone soak off. Acetone makes my nails feel really dry and weak even if I’m gentle! It’s just a really harsh product. I explain how I do fills (you can even do it with a hand file) in the course above!
-
One of the most common issues I’ve heard from people is that their builder gel lifts…. So let’s talk about it!
Why does builder gel lift?
This could be a 100 page post for real but I want to just touch on a few things that will help prevent lifting. And I need to reiterate that this is why it’s SO important to educate yourself on the entire process. You can’t just get a Kokoist product and expect it to work. You need to do the entire process well, I’m talking prep, application, have a strong lamp, etc. or else the entire process won’t work!
The main reasons your builder gel is lifting are:
-
Your lamp is not strong enough
-
I just posted a video on lamps that explains more!
-
I recommend this lamp from Kokoist or this one from Amazon (they both will work with kokoist products and I explained why in that video)
-
-
Your application is not correct
-
I explain correct application in my courses :)
-
-
Your prep is not thorough enough. If you leave any loose cuticle on your nails, you don’t buff them enough, or you leave lifting gel on, this can cause more lifting.
-
Your gel pooled and is touching your skin
-
I always recommend curing one nail at a time to prevent pooling but also you should avoid gel touching your skin to prevent allergies!
-
-
Your products are either low quality or don’t work together well
-
Not all gels are made the same. If you are using a cheap gel from amazon (please don’t do that) you might not get good results! Also, if you are using a primer for example, with a kokoist product, they might not mix well! I only cleanse with isopropyl alcohol which is what they recommend
-
If you are struggling with lifting, here are my recommendations:
-
Read this blog post about Lifting & Chipping Gel
-
Upgrade your lamp is yours is not strong enough or you’ve had it for a few years
-
Apply a thin layer of Kokoist Megastick Base under your builder
-
This is their softest most adhesive base gel, and it can really help bridge the gap if your nails are a little bit weaker to make your builder adhere better!
-
-
Watch my builder gel courses! I promise they will help you so much and find the missing piece that makes your manicures last!
-
Do a finish file! Builder gel shrinks a little when it cures, which means that it pulls away from your free edge, so doing a little file with a 240/180 grit file will help to tuck the natural nail underneath/behind the builder so your free edge won’t separate from the gel when it makes contact with a surface.
Here are some additional resources from my blog that you might find helpful!
BASE GEL, BUILDER GEL, TYPES OF GEL & MORE!
Kokoist x Nail Thoughts Builder Gel Bases Review + Hybrid Gel and Pure Gel Explained!
How I'm Growing My Nails & Keeping Them Strong With Builder Gel!
The Ultimate Guide To Making Your Gel Manicure Last!
And my courses that explain how I use builder gel!
Builder Gel Application Course
Advanced Gel Manicure Class: E-File Fill & Builder Gel Application
Subscribe to my newsletter for 10% off any course!
Ending Thoughts:
I want to leave you with one little note, I feel like a lot of people want to do their own nails to save money and they just start out with buying some cheap sets on amazon and inexpensive lamps, but doing your own nails, especially with gel, is not something that you should jump into without properly educating yourself.
There’s a reason why this is a profession that requires hundreds of hours of schooling and continued education for professionals every year. If you use cheap products and tools, you might end up paying for it in the long run with ruined nails or allergies, which i do not want for you!! Please invest your time in reading my blog posts and watching my courses, it will be worth it in the long run!
If you want to learn more about gel safety and allergies, read these blog posts!
How to Avoid A Gel Allergy + Is HEMA a Bad Ingredient?
Is It Safe To Buy Gel Polish From Amazon?
Gel Manicure Foundations & Safety E-Book
Thank you for reading!!! Let me know if you have any other questions in the comments!