THE ULTIMATE PEDICURE ROUTINE 🦶
There's nothing quite like getting a pedicure at a salon, I loved being the guinea pig at nail school and getting pedicures every week. Now that I'm out of that, I'll be honest, I don't go out for pedicures hardly ever because I feel like I've mastered them at home! Here are my ultimate tips to get the best pedicure at home + my exact process and tools! 🦶
PS. If you're more of a visual learner, check out my PERFECT PEDICURE COURSE!
PS. Anything that's underlined is link!

1. Smoothing your skin / removing dry skin
I know we've all heard that it's bad to soak your nails in water before painting them... While I generally agree, I don't think it's as big of a deal with your feet because they're not exposed to the elements like your fingernails are, and polish usually stays on toes much longer than fingers without chipping!
SO everyone suffers from dry feet, right? Mine are so dry in the winter and I've found some amazing products that have helped me keep them feeling hydrated and prevent cracked heels!
In the shower, I LOVE to use my Bonafide Beauty Foot File. It's made out of glass and it's super gentle yet sooo effective at getting off dry skin/exfoliating your feet. I do this probably 2-3 times per week and it's been game changing!
If you have the Olive & June Pedicure System, you know there's a foot file inside. I do like using this but make sure your feet are TOTALLY dry! I think it works best on dry skin and you have less risk of cutting yourself because this baby is sharp! I will say I use the glass file way more than the OJ foot file, I just enjoy the process more.
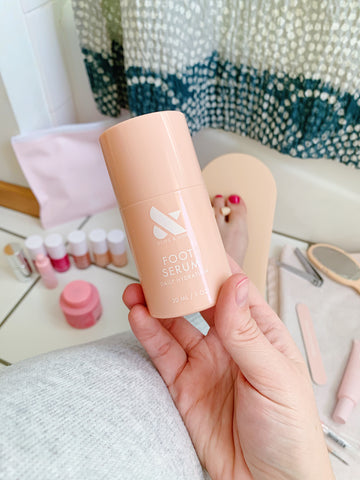
2. Moisturize Your Feet & ToesThis almost feels backwards from a manicure but let me tell you why! I like to hydrate my feet before I paint them because you have to literally rub your feet and if you had wet polish on, you would mess it up! So let's do it at the beginning and start with fresh, clean, hydrated feet before we get into prepping our toes for the actual pedi!
My favorite lotion to use before a pedi is the Olive & June Foot Serum (it's super light weight and hydrating, also it soaks in fast)! If I just filed my feet and I'm hydrating but not painting (because sometimes I don't feel like painting my toes when they're covered in socks and slippers :)), I will use the Miniluxe Hydrating Foot Cream, and the Olive & June Heel Balm + thick socks IN THAT ORDER! Trust me, it's a game changer!
3. Toenail Prep!
We know prep is KEY for a long lasting pedi, here’s my process! I apply all of my manicure prep principles from my Manicure Prep Course to my toes! It's literally the same process, just adjusted for the feet :)
- Wipe your toes with acetone or alcohol before starting any of the prep. This will remove any oils from the lotion/serum that you just put on (or even if you didn’t do that, just trust me and do this). It will also dry everything out, which is good! We want the nail area to be DRY as a bone so you can get rid of dead skin and cuticle. It’s almost impossible to tell alive skin from dead skin when it’s super moisturized. This can lead to cutting yourself and infection. We don’t want that!
- Clip your toenails: I like to use a flat edge clipper. I think these work best for toes because I usually like to have my shape be straight across the top, and then I either clip or file the edges so they’re slightly curved. This actually helps prevent ingrown toenails! I’ve never had them before, but if you have, maybe try this shape and see if it helps! For clippers, I think you can use a small or large one. Whichever you think works best for you! I like to do one single clip across the top, so a small one works fine for my little toes, but a large clipper works better for this on my big toe. I’d love to hear what you use for this!
- File: I love to use a file just to perfect my shape. With the clippers, it does most of the work. Like I mentioned above, I’ll usually file the edges of my toe nails to round them a little bit. So I basically have squoval toenails :) I’ll also file the top edge of my toenail just to smooth it out from clipping and make sure it’s straight across.
- Cuticle work: When I was in nail school, I actually loved doing pedicures because it was so satisfying to transform people’s feet and make them look sandal ready. One of the most important steps in prepping the toes is getting rid of the cuticle that’s grown up onto the toe. This cleans everything up, and makes a super clean, smooth surface for you to paint on! Remember the cuticle is the dead skin that grows UP onto your nail. So when you use a cuticle pusher, you’re gently scraping it off and clearing off the toe of dead skin. Be super gentle when you do this, always push BACK, not down.
Once you push the cuticle back, you might also want to kind of gently push back against the skin to reshape the skin there. Technically, it’s called the proximal nail fold. It’s alive! I like to do this just to make sure my toes all have a uniform shape. Again, be gentle!!
Ok now if you have cuticle nippers, you can nip any of the dead skin. Remember how we dried out our nails with acetone or alcohol earlier? If you need to do it again to make your skin even more dry, go for it! Only clip the dead parts. These should be DRY, and sometimes it’s thicker skin or hard. It’s ready to go. If anything hurts, just move on and let it be!
Buff: I like to use a little buffer on my toes after I do the cuticle prep to get off any pesky bits that didn’t lift off! I love using tiny buffers because my toes are so small. Use the corners of the buffers and gently push back against your skin to make sure you get everything off, but also it helps with that re-shaping thing we talked about above!
Cleanse: The last, and MOST IMPORTANT, step of your prep is to cleanse your toes again with acetone or alcohol. We know this dries out your nails, but now that you’ve buffed and pushed things off, this will also get rid of any debris that’s left over! Make sure that you really work your cotton wipe into your nails and the skin around your toenails too!
4. PAINT!Your toes and feet should be looking great after all of that prep. Sometimes I’ll just call it a day and put a little more foot lotion on after that. But, if you’re here to paint, let’s get into those steps!
I don’t always use toe separators, but if you like them, make sure you put them on here!
My toenails are so small that usually one swipe of the brush will cover the entire nail. If you make any mistakes or get paint on your skin, just dip your clean up brush into a little acetone and gently wipe it away. I typically like to do 2 coats of polish on my little toes, and 3 coats on my big toes.
5. Top CoatI love using a fast dry top coat on my toes because there is nothing worse than smudged polish!! Fast dry top coat generally dries your nails to the touch in 60 seconds, and makes them completely dry in 10 minutes. Here are some of my favorites:
6. Cuticle Oil
Toe cuticles need hydration too! I love using cuticle oil that has an applicator like a brush or a roller ball to control where this goes. Gently apply it around your toes and you should be good to go!! Here are some of my favorites:
Miniluxe Rollerball Cuticle Oil
CND Solar Oil (This is what we used in nail school and it's great!!)
In between Pedicure care:
I usually do my pedicure once a month… I probably should do it more but it’s not top priority in the winter. But I do like to keep up with a little pedi care in between doing all of the above!
- Foot File in the shower! I use my Bonafide Beauty glass foot file probably 2-3x per week in the shower. Just scrub your heels and any rough skin.
- Scrub!! If you have a body scrub or a foot scrub, do this once or a few times a week to help get rid of dry skin. It feels so nice! This one is my favorite that I have been using recently!
- Apply hydrating foot lotion and treatment. You probably know by know that my routine is Miniluxe Foot Cream, and Olive & June Heel Balm (put it alllll over. On your heels, calluses, and then rub some onto your toes and cuticles!) and then put on thick socks.

I love having a fresh pedicure, but it’s also so great to take good care of your toes to keep them healthy and feeling great!!

Here are my favorite tried and true products that I use for my pedicures at home!
The Pedi System from Olive & June
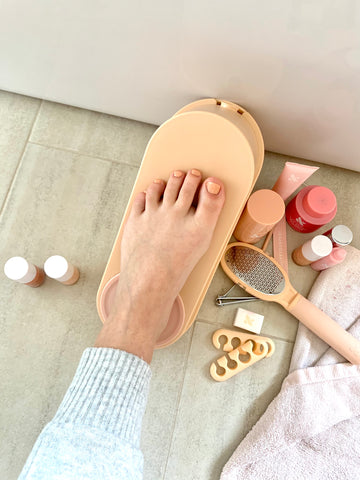
If you want everything in one to do you Pedi, I cannot recommend the Olive & June Pedi System highly enough! It has all of the tools you need to do you pedi, PLUS it comes in this amazing super genius box where you can turn the top around, it has a silicon piece at the base where you can rest your heel and it angles your foot at a really comfortable position for doing your pedi. I’m such a fan!!! You can save 20% on this system with my code OJKARA20 and shop it here!
If you get this pedi system, it comes with a cuticle pusher that I LOVE!! The only thing I would add outside of this system to use is a cuticle nipper (if you want it), and some acetone or alcohol plus cotton balls/lint free wipes for cleansing :)
I also sourced some questions from instagram! Here are some popular ones:
Do you use cuticle remover?
I have mixed emotions about this one!! While I do really like cuticle removers and they seem to work, I also don’t like how they rehydrate your nails and make it more difficult to discern dead, dry skin from living skin. And then you’re also rehydrating your nails which means polish won’t stay on as well. If you want to use this, go for it, but I personally have stopped using it.
Thoughts on gel pedicures for weak toenails?
I love gel polish so much! If you want to use gel on your toes, go for it! Just make sure that you properly prep your nails and you follow the instructions for use, and remove it properly too or else you will be making your nails even more weak! Are you interested in my full in-depth gel process?
I find it tricky not to mess up my mani while doing my pedi…
This is tough! There’s really no way to not mess up your fingernails when you’re using acetone on your feet. I would suggest that you plan your mani and pedi process so that you do your pedi before your mani. Or you could paint your non-dominant hand, paint your toes, then paint your dominant hand.
What do you do about peeling toenails?
Peeling toenails generally mean they’re dry, maybe from lack of moisture but also from leaving your polish on for too long. If your toenails are peeling, I would suggest taking a week off from wearing polish. After you shower and scrub your feet, put on your foot lotion and use a super hydrating foot balm and cuticle oil before putting socks on! Do this a few times that week to really focus on hydration. You can also gently buff your toenails upwards once or twice during the week before putting on cuticle oil (put the oil all over the nail). Remember to change your polish every 2-4 weeks to prevent your nails from drying out too much!
How to avoid getting polish all over your skin if you have tiny toes?
If you get polish all over your skin due to tiny toes, you could try using the narrow edge of the brush if it’s wide (like Olive & June’s brush), or use a polish with naturally narrow brushes. You might have to open and close some bottles to find the size. One of my favorite brands with narrow brushes is Côte!
Best angle / position to do your pedi? I’m always so uncomfortable!
My favorite position is to lean my back against something and prop my foot up onto something. For example, I like to lean against the bathtub and prop my foot onto the O&J Pedi system! You could also sit on a chair and prop your foot onto a coffee table or another chair. Just make sure both surfaces are stable.
Favorite pedi colors?
If you have any other questions, drop them in the comments!
Happy Pedi’s!
Don't forget to check out my Manicure Prep Course to learn how to properly prep your nails and toes in real time!!
PS. Some links may be affiliate links which means I get a small commission on your purchase at no cost to you! Thanks for supporting me and my blog!
I love this pedi kit you featured. I ordered an extra set of the socks and oil stick.
Thank you for all your tips!😍